I’ve been building a laser tag system for my kids and it’s in a working state now. So I’m sharing my instructions with the rest of the world here. Enjoy! It might take some time to document everything, so stay tuned.
Some design decisions:
- arduino based (Manchester encoded 16 bit codes; interrupt driven).
- high power infrared LED for “laser”, with 1A pulses – they make for an impressive 150+ meters, daylight, range! I’m not sure about full sunlight, but on a shady day, playing laser tag is perfectly possible.
Adding up the parts, including enclosure, wires and flashlight, your investment could be as low as €20 per gun, maybe even less if you know your way around in the Chinese parts shops. (And if you have Big Plans: I’m guessing that the whole BOM might be less than €5 if your batch is large enough – but hey, it’s a hobby, I’m not an electronics manufacturer of any kind).
Parts list
Central to the system
- an Arduino “Pro Micro” microcontroller
- a switch (for trigger)
IR power LED driver circuit
- 1000µF 16V capacitor
- resistor 0.5 to 1Ω, 1W
- resistor 2k2Ω
- MOSFET IRLZ44N
- transistor BC547B
the “laser” itself
- 1 power IR LED. I bought 20 of these, 850nm, 60degree, 16mm
- 1 flashlight with adjustable focus, like this one or this one.
Or just buy a flashlight with built in IR LED.
display
- TM1637 based display
- 2 10KΩ resistors
IR detection
- 4 VS1838B IR-receivers
- a 10µF capacitor
Optional: vibration control
- resistor 15Ω
- resistor 4k7Ω
- transistor BC547B
- diode 1N1004
- vibration motor 3V3
stuff
- A head band of some sort
- Some wire
- battery case, preferrably with switch
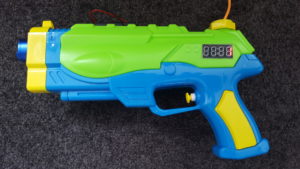
- A water pistol or any other enclosure for your guns. Anything goes. If your kids are comfortable playing laser tag with a salad bowl, a tape dispenser or an a barbie doll, use those. Do send pictures.
Some background
Laser tag is not exactly something involving a laser. In fact, laser tag guns use infrared signals to hit opponents. So in a way, a laser tag system is some sort of remote control on steroids. No lasers, sorry.
Central to my laser tag system is a Microchip (former Atmel) ATmega32u4 microcontroller. The Arduino series of boards form a perfect way to use these – without the need for creating PCB’s, SMD-soldering and the like. I started off using the Arduino Micro, but after a few iterations, the Arduino Pro Micro turned out to be just fine. I’m not using more modern microcontrollers, mainly because both sending and receiving IR beams in my laser tag system is interrupt driven and uses a lot of on-chip timers. I’m programming the ATmega32U4 pretty low-level. So please feel free to reprogram stuff for the ESP32/ESP8266 – but reprogramming the timer setup might cause a headache or two.
I’m using a rather straight forward power LED driving circuit, shamelessly stolen from Dan Goldwater at http://www.instructables.com/id/Circuits-for-using-High-Power-LED-s/. The MOSFET chosen has a Vth of 1-2V, which is perfect for our application. About the resistors: our IR pulses are 1A, but they will be 1ms each (with 38KHz 50% duty cycle), so you probably will get away with regular 100mW resistors. I’m just not taking chances.
Choose a flashlight that will let you make a projection of the built in LED on the wall. More on that later (with pictures).
IR detection is done by cheap VS1838B infrared receivers. I’m not even connecting them the right way: various data sheets suggest RC-filtering to suppress power supply disturbances, but we’ll be using batteries for power so there is no use for these extras. I’m adding a 10µF capacitor just because we can.
Optionally you can add a vibration motor to your guns: the gun will start to buzz when you are under fire.
Code
The code is at lasergun-micro-pro.ino (main program) and weapons.h (header file with a couple of guns) for now. No license yet – again, stay tuned.